

What’s the difference between subtasks and relations in Notion? And which should I use to keep track of my projects?
First, why are we talking about this? What’s the point?
If you’ve ever tried to handle school, business, or personal projects on Notion, you probably know that tracking projects also means tracking the tasks within them. It can be confusing when you have to organize several projects, each with many tasks.
It’s not just projects. You can have many other planners that each have items with multiple contents.
Most people use either:
Use Notion’s built-in subtask feature or…
They use relations to link a task database to a project database.
So what should you do?
Let’s talk about subtasks first.
How to do subtasks in Notion
Let’s open a new page and create a to-do list. See the steps and video below for a quick explanation.
Click on “+” to open a page.
Click on “Table” near the bottom.
On the right, select “New Table”.
Type “To-do List” for the title (nothing crazy).
Delete the “Tags” property.
Next to the box that says “Name”, click on the “+”.
Select “Checkbox”.
Repeat the last two steps to add “Date”.
Now that we have our To-Do list, let’s turn on subtasks.
All you have to do is:
On the top right of the table, click on the three dots.
When you see the menu, click on “Customize To-Do List”.
Where it says “Sub-items”, click on “Add”.
Then click on “Turn on sub-items”.
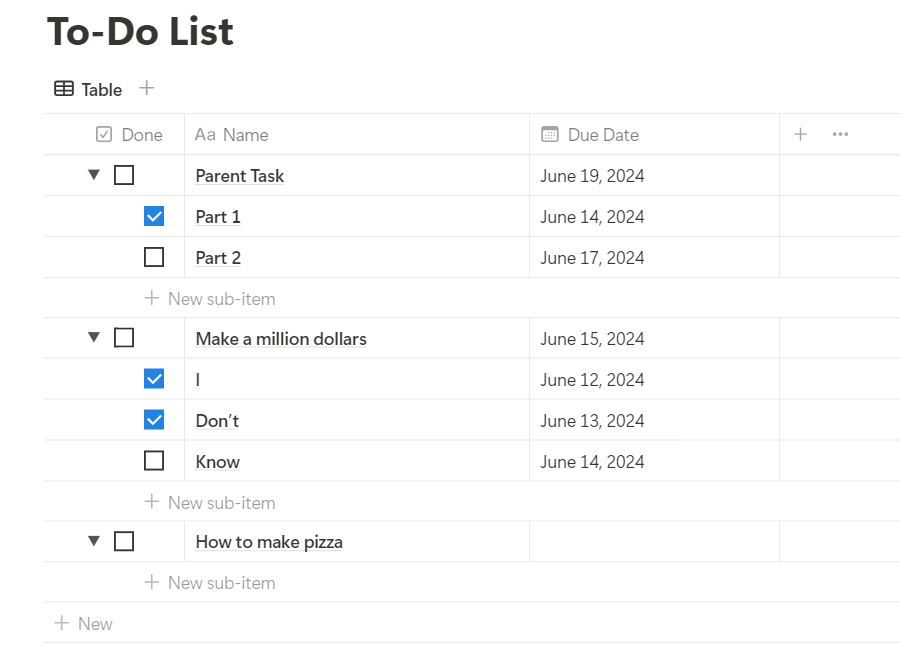
Now you have subtasks! You can also create dependencies. Dependencies are when current tasks can block or shift the due dates of future tasks that depend on the current task being finished. That is a topic for another article.
What are subtasks good for?
As a short answer, subtasks are better for temporary or one-time tasks that you won’t need to save for later. They are for non-project items that have several steps but are only done once or twice. I’ll explain what this means through the examples.
Benefits
They are much faster to set up. It only took 12 steps above to create a To-Do list with sub-items.
You can use the Dependencies feature to automatically move due dates.
You can see all the sub-items with the parent items in the same place so it’s easier to follow.
What should you use it for?
You can use it for tracking workouts with multiple exercises each with a different number of reps.
If you’re reading a book and want to keep track of the chapters you read, you can have the book as the parent item and each chapter + the notes as a sub-item.
For any musician (guitarists, for example), when you’re learning a song and want to break it down into parts, just use sub-items for each section. Then, I would add a way to record how much you know of each section or how fast you can play it.
If you want to write some short notes under a task without opening a whole page, use a text box and sub-items to write a line of notes. You can add more sub-items for more lines of notes.
This might be the most helpful of them all, but with sub-items, you can record multiple sets of numbers for each property for multiple items.
How to use relations in Notion
Let’s set up another database for areas of your life (just an example).
Create another blank page.
Drag the “To-Do” list page inside the blank page. Now it’ll show the To-Do list as a link inside our new page.
Right-click on the link, and select “Turn into inline”.
Previously, the to-do list was a full page so we couldn’t add anything else below it. Making it inline allows us to add another database on the same page. Now let’s create an Areas section.
Type “/table”, select “Table view”, and click on “New table” on the right.
Name this one “Areas”, you can name it “Projects” too.
In the “Name” column, type in the areas of your life. You can add page covers too.
Delete the “Tags” property.
Click the “+” next to “Name” to add a property, and select “Relation”.
Under “Related to”, select “To-Do List”.
Make sure to turn on “Show on To-Do list”. Under that, type in “Areas”. This is what will show up on the To-Do List table.
Go back to your To-Do List and check if the Area column is there.
For each task, click on the box and add the Area that this task is related to.
You can also change the Area table to a gallery. Just click on the three dots, click on “Layout”, and change it to “Gallery”.
When you have the gallery, go to “Properties” and make sure “Tasks” is shown.
Now you can manage Areas of your life or Projects with this basic system using relations.
What are relations good for?
While the sub-items feature is for temporary tasks, relations are better for ongoing or continuous projects. Anything that needs to be tracked continuously and doesn’t necessarily end needs to be managed with relations. Also, anything you want to save for later that contains other saved items. I’ll explain this with examples.
Benefits
A separate database can look much more organized than many items with sub-items.
Sub-items aren’t connected to their parent item. Changing a sub-item won’t change anything about the parent item. Whereas, if you link two tables together, changing items on one table can update parts of the other.
You can have several layers of relations. For example, you can have a To-Do List that links to a Project List that links to your Life Areas. All three can be separate tables.
When you have several task pages linking to one project page. With the Rollups feature, you can calculate and show the percentage of tasks completed, the number of incomplete tasks, averages, sums, and more. You can make it a more insightful Project Planner.
What should you use it for?
You can use it to track habits. Have a list of habits that show up in your To-Do list that link to a separate gallery of Habits. You can create formulas to show if you’ve met your goal or even how many days in a row you’ve completed a habit.
You can make recipes and meal plans. Have one table listing every ingredient you need that links to a recipe database. This recipe database can link to a Meal Planner database. This way you can always see which meals are eaten when and plan your groceries based on the ingredients needed.
You can store the types of exercises for your workout tracker mentioned in the previous section. Have a database that lists your muscles or even muscle groups (arms, core, legs, etc.). Have this link to an Exercise database (push-ups, sit-ups, squats, etc.). That way you can see which exercises to do based on the muscles involved.
You can make a school planner. Have a database that keeps all of your assignments, tests, projects, and class notes for all of your classes. Link that to a database that just contains your classes. You can then organize your tasks by class. You can create rollups and formulas to determine your grade and see your unfinished tasks.
If you have a Journal in Notion, you can organize and store your journals by month or year. Just link your journal database to a table containing the names of each month. Create a relation to link your journals to whichever month they were written.
Conclusion
To answer the question of this post: You should use both subtasks and relations in Notion when planning tasks and projects. But it’s better to use them in different situations:
Only use subtasks for temporary tasks with multiple steps that you won’t need later. For example, if you’re trying to apply for a certification there are steps and forms to fill out.
Use relations for ongoing projects or Areas where you’ll need to save the contents to use later. For example, when you’re keeping track of habits, habits don’t change or end. They’re always recurring until you want to stop.
I hope that this article helped and you now know how to use sub-items. I’ve tested both of these features and this is what I found from experience managing my content and my personal life.
Thanks for reading and please subscribe for more Notion content! Also, if you know anyone who wants to learn about Notion, share this Substack with them!