Welcome to the LinkedIn Content Dashboard
Are you a LinkedIn content creator? Do you need one place to edit and store all of your past, present, and future content?
Welcome to my ultimate LinkedIn Content Creator notion template designed specifically to manage your content easily. Keep track of upcoming posts, posting schedules, ideas, drafts, notes, post analytics, and more with this template.
No more:
Writing drafts on your phone’s notes app
Scrolling through LinkedIn to find a really old post of yours.
Forgetting what you wanted to write about.
Forgetting to post at the right time.
Losing information you learned that you wanted to post about
This template has:
A database to write down and keep your ideas and drafts.
A system to find posts and get to them quickly with a link.
A quick creation feature to write down your ideas in seconds.
A calendar schedule feature to see which posts to publish and when.
A notes database where you can write down information you could use in posts.
You can buy the template by clicking here or at the bottom of this article.
In today’s newsletter, I’ll be walking you through how to use this system
The Template
This section will have an in-depth walkthrough of the template. There are 4 parts to this tracker:
The post database
The notes database
The analytics database
The focus page
Finally, the Home page will bring them all together so that you don’t have to jump around pages.
Let’s start with-
The Post Database
The post database will be where all your posts are stored. Crazy.
Normally you shouldn’t need to go to this page since the home page has what you need. Nonetheless, you will need to understand the entire database and all its components.
Walkthrough of Properties
As shown in the picture there are 8 database views you can look at on this page. Let’s start by explaining each column.
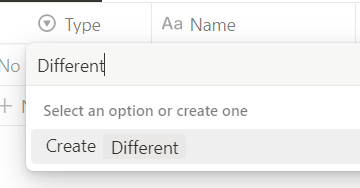
Type - You can distinguish and organize between regular posts and carousel posts. You can add other types of posts by clicking on a row and typing a new category like so:
Name - Enter the name of your post.
Status - Organize posts by “Idea”, “Draft”, “Posted”, or “Archive”. “Ideas” are ideas for future posts. “Drafts” are for finished or unfinished posts that you haven’t published yet. The “Posted” category is for recently published posts that you want faster access to while “Archive” is for older posts that you don’t need to see but still want to keep.
Post Date - Set a date and time you want to publish your post. This is NOT going to publish the post on LinkedIn automatically. This is just to help you remember when you wanted to publish.
Link to Post - When you’ve posted, you can paste the link in this column to get to the post directly.
Days From Post - This will tell you how many days are left until your Post Date or how many days it’s been since the Post Date.
Notes Database - This is a “relation” to the Notes database which means you can link a relevant notes page to one of your post pages for quick and easy access.
The “All Carousels” view looks the same except for the “Carousel File”. You can store your carousel file in this column whether it’s an image or a pdf.
Next, we have the Kanban board tab1 for your posts. This will organize the posts into columns based on the status of the posts. Then the calendar view will display a weekly or monthly perspective of your scheduled posts. You also have the option to connect it to your Notion Calendar. I can make a separate tutorial on that later.
Finally, the last 4 tabs are each status category with its own tab. For example, the “Idea” tab will only have posts with the “Idea” status. The “Idea” and “Draft” tabs don’t have anything new, so let’s look at the “Posted” and “Archive” tabs.
In addition to the previous properties mentioned. You can also record how your post is doing in terms of analytics. You can record:
# of Impressions
# of Reactions (likes, hearts, etc.)
# of Comments
# of Reposts
# of current followers
# of estimated followers added from each post
Similarly, you can write down a few keywords for the “Hashtags" used and the “Topics” of the post. Finally, there is a “Day and Time” property that you won’t need right now. These last three properties will be more useful when looking at the Analytics section later so make sure you fill in the hashtags and topics whenever you can.
Another feature of this page is the-
Page Templates
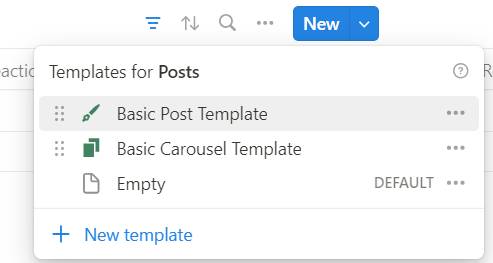
If you click the drop-down next to the blue “New” button, you’ll see these three options.
Each template serves as an option for automatically filling any new page you create, saving you from having to rewrite the same outlines or calls to action every time. Currently, the “Basic Post Template” just has a generic outline of the average LinkedIn post and a call to action. The “Basic Carousel Template” has links and resources to software that help you design carousels. You can edit the template by clicking on the three dots and selecting edit. This will change the text that will automatically appear on a new page.
How it looks on the Home Page
At the top, there should be a “Quick Add” section on the left. Clicking on “New Idea” will generate an empty page with the type of post as a regular “Post” and the status as “Idea”. The “New Draft” will generate a page with the “Basic Post Template” outline with the status “Draft”. The “New Carousel” template will generate a page with the “Basic Carousel Template” contents with the type of post being “Carousel” and the status being “Idea”.
On the right, there is the Kanban post board from before except the “Archive” section is hidden to not take up too much space.
Below, we have the same 3 tabs as before. Each tab has posts only with the corresponding status. The “Drafts” and “Posted” tabs are grouped by post type so you can easily see which posts are regular posts vs carousels.
Finally, there is the calendar view. Here you can switch between a weekly calendar and a monthly calendar.
The Notes Database
Walkthrough of Properties
So this is MUCH simpler than the Post Database. There are much fewer columns to see.
Name - Name the note.
Topic - Write a few keywords of the topic of the note. This is to see which posts are relevant to the note or vice versa.
Creator - If there is a person or publication that keeps coming up you can add the name to a list for a quick search later.
Source - A link to your source of information.
Created time - Automatically sets whenever you create a note.
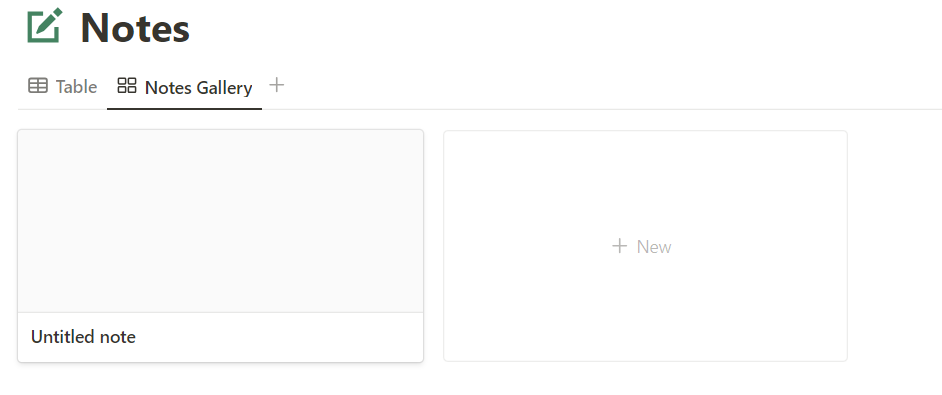
Notes Gallery
The next tab is a gallery of your notes sorted by recency. The most recently created posts will be shown at the top. The cards will just show the page text.
How it looks on the Home Page
In the “Quick Add” section, there should be a “New Note” button that creates a page in “Notes”. Right below should have a small view of the notes gallery. The “Open Notes” button will open the Notes page. This section should only show notes from the past week.
Analytics Section
For this section, we’re going to stay on the Home page because there’s no need to look at the separate page.
This section is meant to help you analyze your post numbers and statistics and compare posts based on the date and time published, hashtags used, and topics of the post.
There are three parts to this section. The Basic Stats, the Engagement Stats, and the Follower Stats.
The Basic Stats - Impressions, Reactions, Comments, Reposts
To find the highest performing posts.
Engagement (Ratios) - Reactions/Impressions, Comments/Reactions, Comments/Impressions, Reposts/Impressions
To find the posts with the most engagement.
Follower Stats - Followers, Followers Gained, Followers Gained/Impressions, Impressions/Followers
To find the most effective posts to gain followers.
Each part has a table with three tabs: hashtags, topics, and time. These three are the “independent variables” in this analysis. This means each of these will affect your analytics in different ways. You’ll notice in the “Day and Time” tab the date is formatted as the day of the week and time of day. I find that is more helpful than just a date when determining the best times and days to post.
All three of the tables have the same 3 pages lettered A, B, and C. These are for comparison. Choose posts and compare numbers. When you edit a page in one of the tables, it should show up in the rest of them. This means if you add a post to one table, you don’t have to add them to the other tables and you can look at all of the stats simultaneously.
I thought this would be a neat way to analyze how certain variables affect your post analytics. If you want to add a new tab with a new variable, just duplicate one of the tabs and change the shown properties to your new independent variable. If you want to combine the three tabs, just delete two of them and change the shown properties on the last tab. My next post will be all about building this system from scratch so I will explain how to do this in more detail.
And that’s the template! But wait… there’s mo-
The Focus Page
This page is the final part of the template. This page is meant to block out all the other distractions and help you focus only on writing or editing. It has a simple and minimal design. There are just three sections.
Write - The table only shows “Ideas” that you haven’t written into full drafts yet.
Edit - Only shows “Drafts” that are written but not posted. It also sorts the post by the publishing date so you see the soonest to be published at the top.
Notes - The section for quick access to your notes.
At the top, there are three buttons. One to create a post, one to create a note, and one to open the full notes page.
Other Features
At the bottom of the Home Page and Focus Page, there should be a small menu with links to all the pages in the little box. If you edit this menu on one page, it’ll also change on the other.
To get notifications and reminders of when you want to post, I suggest connecting this template to Notion Calendar (which also syncs with Google Calendar). This way, you can be reminded to post at your chosen time even if your Notion is not open.
Just a reminder that this DOES NOT integrate with LinkedIn. For example, if you set a post to be published tomorrow on Notion, that won’t do anything on LinkedIn unless you publish it yourself. At the same time, you will have to enter most of the post analytics into the Notion database. The impressions, reactions, comments, reposts, followers, and followers gained will have to be entered manually, but all the other numbers in the Analytics database will automatically fill in since they’re formulas.
And that’s the template!
Summary
If you are a content creator on LinkedIn, this system will be perfect for you. This template is designed to organize and store your content so that you can focus on what’s important: writing, commenting, and growing your following.
To summarize this system:
The Post Database stores and organizes posts by status and publishing date.
There is a Kanban board, a table of posts for each status, and a post calendar.
The Notes Database stores all your notes.
The Analytics section helps compare post-analytics based on different variables.
The Focus Page helps you focus on writing and editing.
Quickly add new table entries with buttons.
Drag and drop posts between statuses in the Kanban board.
Create templates for written or carousel posts to save time.
Link notes pages to your post pages for quick reference.
Get the Template!
Hey, so you can buy this full template for $10 on Gumroad with this link:
https://stayontask.gumroad.com/l/linkedincontenttracker
Thanks for taking the time to read through this walkthrough. I hope it helped you understand how to use this template. I tried to make this system as easy to use as possible for people who don’t use Notion.
Lastly, I hope this system helps you and saves you time! That is my main goal here at Stay On Task so if you end up buying it, please leave a review on Gumroad for feedback to improve my future templates.
Thanks for reading and remember to subscribe for more Notion content!
Kanban is a Japanese word that translates to “signboard”. Developed by a Toyota industrial engineer to run manufacturing more efficiently.


