Build a LinkedIn Content Tracker on Notion from scratch with me! (Part 1)
A few days ago I put up my first Notion template for sale! I also wrote a post about its features, benefits, and how to use it.
Click here to see the post:
Today I’ll teach you how to build this template from scratch if you’re more of a DIY kind of person. (Also if you don’t want to pay $10 for the template.) But, if you want to get it immediately without building it, you can buy it here!
https://stayontask.gumroad.com/l/linkedincontenttracker
Without further ado, let’s get started!
In my previous post, I said there were 4 different parts to this system: the Post Database, the Notes Database, the Analytics Database, and the Focus page. Since we’re building it this time let’s split this into 7 sections:
Post Database
Notes Database
Analytics Database
Home Page
Analytics Section
Focus Page
Document Templates
Let’s start with the first one.
The Post Database
So let’s create a new page in our workspace and call it “LinkedIn Content Tracker”. You can add an icon as well if you want.
Press “Enter” to create the first block, type in “/page”, and hit “Enter” to create a new page inside this one. Once you get a blank page, you’ll see a few options. Right below it says “Get started with”, click on “Table”.
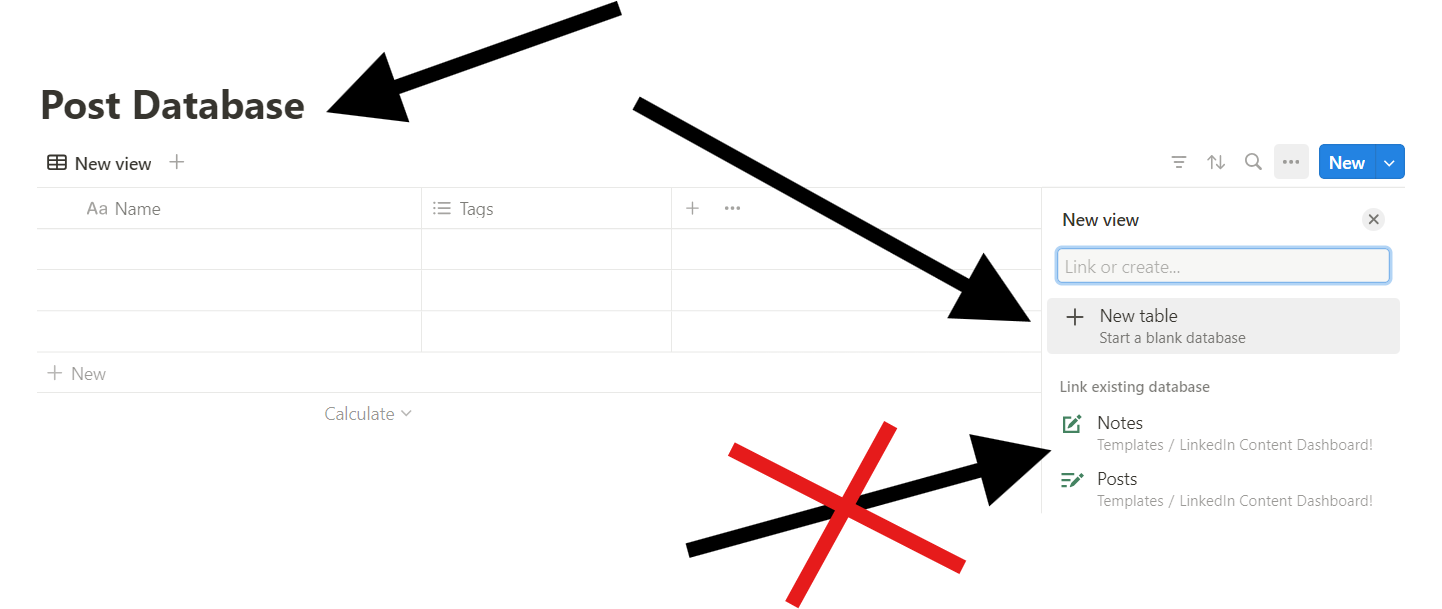
A new database should appear in the table format. On the right click on “New table” so that it creates a new database instead of using any others in your workspace. Name this “Post Database”. You can also call it “Posts” to be concise.
Right now, you’ll see two columns in the table: “Name”, and “Tags”. Let’s keep the “Name” column but delete “Tags”. To do this, just click on the square that says “Tags”, and click “Delete property”. Now our database is ready for building!
We have to create 17 different properties/columns. Let’s try to do this efficiently starting with…
Post Type - This is to distinguish between written posts, carousels, and any other types of content. To create this, click the “+” as shown above and select “Select” on the right. Name it “Type” (or whatever you want) and where it says “Add an option”, create two options. Name them “Post” (for written post) and “Carousel”.
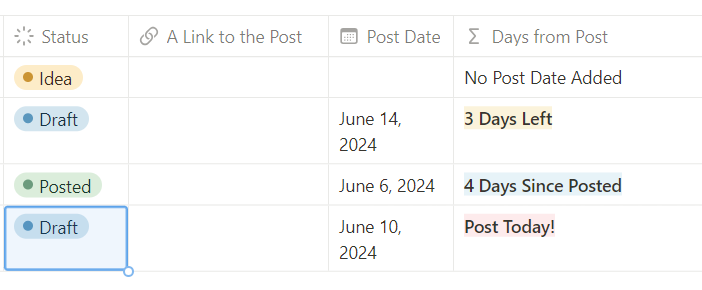
Status - Organize your post entries by how far along the writing process they are. Press the plus sign again but this time select “Status” on the right. You can keep the name as “Status”. You’ll see how each status has a given name “To-do”, “In progress”, and “Complete” all have the corresponding names “Not started”, “In progress”, and “Done”. Change these to “Idea”, “Draft”, and “Posted”, respectively. You can do this by clicking on each name and changing it. Also, add the “Archive” status to the “Complete” section.
Link to Post - This keeps the URL for any past posts that you want to go back to. Press the plus sign, then select “URL”. Name it “A Link to the Post” if you want.
Post Date - Setting this in Notion helps us remember when we want to publish a post. Add a new property, and select “Date”. Name it “Post Date”.
Days From Post - Tells you how many days it will be until your Post Date or how many days it’s been since the Post Date. This requires a formula. Create a property and select “Formula”. Name it “Days from Post”. Click on the square right below the top of the column. A box to enter your code should appear. Copy and paste this formula into the box. Make sure your Post Date is called “Post Date” or it’s not going to work.
ifs(prop("Post Date") < today(), style(dateBetween(now(), prop("Post Date"), "days") + " Days Since Posted", "b", "blue_background"),
	prop("Post Date") > today(), style(dateBetween(prop("Post Date"), now(), "days") + " Days Left", "b", "yellow_background"),
	prop("Post Date") == today(), style("Post Today!", "b", "red_background"),
	"No Post Date Added")
For those unfamiliar with Notion formulas, this just checks whether the Post Date is before, after, or on today and produces a different message accordingly. If the Post Date is after today, it tells you “X days left”. If the Post Date is in the past, it’ll say “X days since posted”. If the Post Date is today, it’ll say “Post Today!”.
Day and Time - This is another formula that translates the “Post Date” into a day of the week and time of day. Repeat the steps of creating a formula property from the last one. Name it “Day and Time”. Copy and paste this formula into the code box.
ifs(day(prop("Post Date")) == 1, "Monday at " + formatDate(prop("Post Date"), "h:mm A"),
	day(prop("Post Date")) == 2, "Tuesdayat " + formatDate(prop("Post Date"), "h:mm A"),
	day(prop("Post Date")) == 3, "Wednesday at " + formatDate(prop("Post Date"), "h:mm A"),
	day(prop("Post Date")) == 4, "Thursday at " + formatDate(prop("Post Date"), "h:mm A"),
	day(prop("Post Date")) == 5, "Friday at " + formatDate(prop("Post Date"), "h:mm A"),
	day(prop("Post Date")) == 6, "Saturday at " + formatDate(prop("Post Date"), "h:mm A"),
	day(prop("Post Date")) == 7, "Sunday at " + formatDate(prop("Post Date"), "h:mm A"),
	"No Post Date")
The “day()” function formats the date into a number from 1-7 that corresponds with each day of the week. This formula tells it to show the actual name of the day. It’s formatted like “Wednesday at 10:00 AM” for example.
Carousel File - Let’s add a holder for your carousel or image files. Click on the plus, then select “Files and media” on the right. You can rename this to “Carousel/Image File”.
Hashtags + Topics - These two properties will be helpful for your Analytics page as independent variables. They can also be used to categorize posts by topic for easier database searches later. Create a new property, select “Multi-select” this time. Name it “Hashtags”. Then, click on the name “Hashtags”. In the drop-down menu, click “Duplicate property”. It should create another Multi-select called “Hashtags (1)”. Rename that to “Topics”.
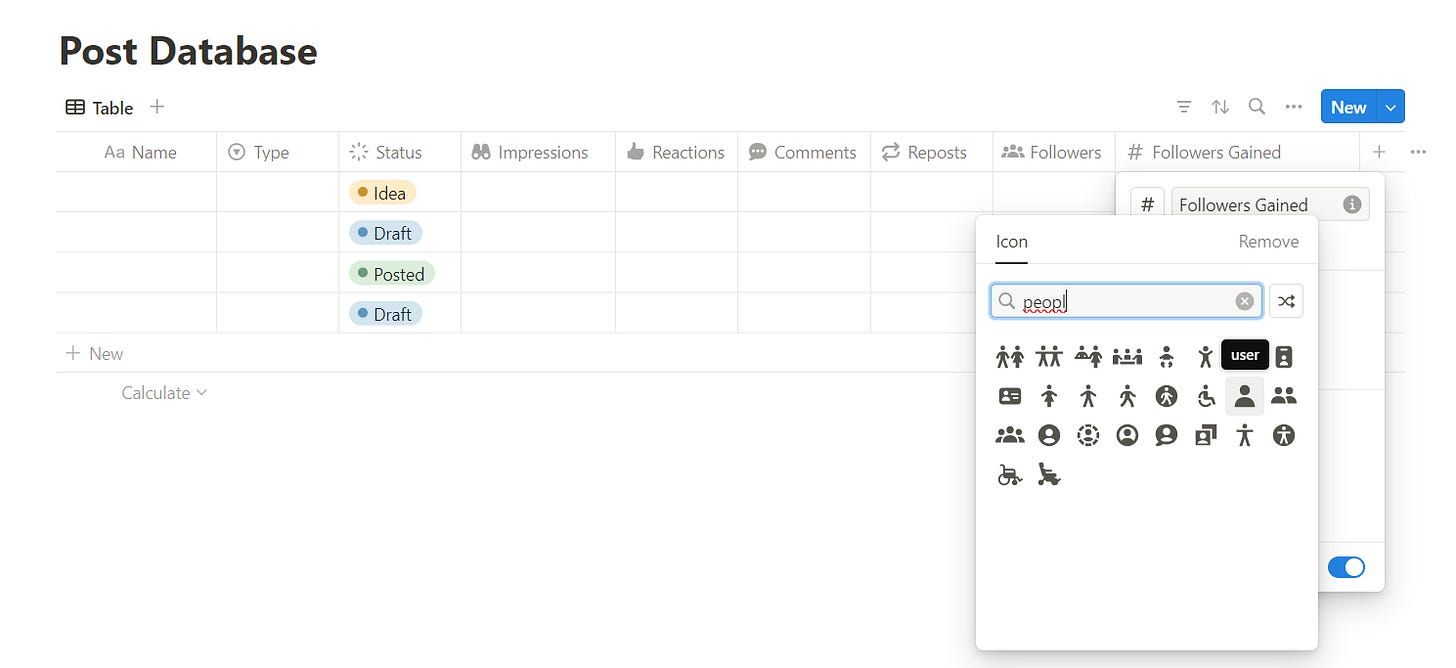
The Numbers - It’s time to add the number columns. There are 6 of these columns we need to create: Impressions, Reactions, Comments, Reposts, Followers, and Followers Gained. To start, click on the plus sign and select “Number”. Don’t rename it just yet. Instead, hit the “Duplicate property” button 5 times. You should have 6 columns called “Number”.
Rename each one to each of the names listed above. You can also change the icons to make them distinguishable. It’ll look like this.

And that is the Post Database. Right now you should have 16 out of 17 properties in the table. We’ll create the last one in the next section. We will organize this database later.
Notes Database
Let’s create our Notes Database! This is for notes that you want to keep as material for future posts. It’s much simpler than the Post Database because there are only 5 columns.
To start, go back to the Home Page. Type “/full” and select “Database - Full page”. This is quicker than how we created a database in the last section. Let’s name this page “Notes Database”.
Name - It’s just the name.
Topic - To organize your notes by topic and make searching through this easier. Also can help see which posts are relevant to this note. To create this, just rename the “Tags” column to “Topic”.
Creator - If there is another content creator you follow that you take notes from repeatedly, you can add their name here. Just duplicate the “Topic” column and rename it to “Creator”.
Source - Add a URL to the source to give credits if needed. Add a URL column and name it “Source”.
Created Time/Last Edited Time - This column will help you sort your notes by either when it was last edited or when it was created. When you click on the plus sign, select either “Created time” or “Last edited time”. You can decide on your preference but I’ll choose “Created time” since it’s more linear. To sort your notes, click on the property name and select “Sort descending”. That way it’ll show the newest first.
Post Database Relation - This is to link your posts in your Post Database to your notes in your Notes Database for quicker access when you’re writing. Add a new property and select “Relation”. It’ll give you this menu below
Select “Post Database” because that’s what you want to link. Name this property “Related Posts”. Then click the “Show on Post Database” switch to ON because you want to see the notes in the post database. Under “Related property on Notes Database”, type in “Related Notes”. Finally, click “Add relation”.
Now let’s go back to our Post Database for a second. Well, would you look at that! There’s a new property called “Related Notes”. If you click on it, it’ll give you the option to link a page from your notes.
We are now finished with the Post Database and Notes Database. Let’s move on.
The Home Page (Pt. 1)
Now that we have these two databases, we have what we need to organize the first half of the home page.
Let’s go back to the Home Page. Add the top right corner, click on the 3 dots, and make sure your page is “Full width”. This will add much more space.
To save more space, we’re going to put all the pages on one line. To do this, hover your mouse over the “Notes Database” page. You’ll see 6 dots on the side, click on this area and drag the block to the right side as shown below.
Buttons
Now let’s create the buttons. There are 4 buttons to create.
The first two will create a new entry in the Post Database. It will automatically fill out some of the columns. The status will be “Idea” for the first and “Draft” for the second and the type will be “Post”. See the video.
Type “/button” and hit Enter.
Name the first button “New Idea”. Name the second “New Draft”.
Click on “Add action”.
Click on “Add page to…”
Click on “Select database” and select “Post Database”.
Leave the name and click on “Edit another property” and select “Status”.
Set the status to “Idea”. For the second, set it to “Draft”.
Click on “Edit another property” and select “Type”.
Set the type to “Post”.
The third button will add a new entry in Posts as a Carousel instead of a written post. See the steps and video below.
Click on the 6 dots on the left of the “New Idea” button.
Click on “Duplicate”.
Click on the little gear to the right of the new button.
Rename it “New Carousel”.
For the “Type” change it to “Carousel”.
The fourth button will add a new entry into the Notes Database.
Duplicate one of the previous buttons.
Rename it to “New Note”.
Change the “Add page to” to “Notes Database”.
Click “Done”.
Let’s group these buttons all into one box. In Notion, we use a type of block called a “Callout” for emphasizing certain text or blocks. We can also use it to provide an outline and organize our page graphically.
Type in “/callout”.
At the top line, type in “Buttons” or “Add New”.
Select all 4 buttons by clicking and dragging over them.
Move them into the box. There should be a blue line indicating when it’s in the box.
Post Database Views
Now let’s make all of the views for your posts. We’re going to start with the Kanban board. A Kanban board is a way of organizing posts into columns based on status. You can drag and drop each entry into a different column to change the status. Here are the steps and the video to help you.
Enter a new line of text and type “/linked” to create a linked view of a database. This is just creating another view of a database that already exists.
On the right, under “Link existing database”, select your “Post Database”.
Select “New table view”.
When you get to the options for the new view, select “Board”.
You can name this view whatever but I just chose “Kanban Board”.
You can change the card preview (the picture above each card on the board) to the page content (the text inside), the page cover (if you gave it a cover), or the carousel file property that we made earlier. I just kept it to no card preview.
You can change the card size too. I kept it to medium.
To make it look nicer you can turn on “Color columns” which just colors each column with whatever color each status is highlighted by.
Finally, click “Done” to finish setting up the board.
Once you get to the board menu, click on “Properties”.
Change the shown properties to be whatever you want by clicking on the eyes to the right of them. I chose “Type”, “Post Date”, and “Carousel File”.
You can hide the database title if you want. The board looks better if it’s hidden.
Then we’re going to create another callout by typing “/callout” and calling it “Kanban Board Post View”.
Click and drag the board into the callout.
Now let’s do table views for each status. This is similar to the Kanban board but we’re going to make each status have its own table.
Enter a new line of text and type “/linked” to create a linked view of a database.
On the right, under “Link existing database”, select your “Post Database”.
Select “New table view”.
This time, choose “Table” and name it “Ideas”.
Then duplicate the table twice from the database menu.
Name the second tab “Drafts” and the third “Posted.”
For each tab, select the “Filter” icon on the top right of the table.
When it shows the drop-down, select “Status” as the property being filtered.
For the Ideas section, check the box for “Idea” to make it only show posts where the status is “Idea”.
For the Drafts section, check the box for “Draft” to make it only show posts where the status is “Draft”.
For the Posted section, only click on “Posted” instead of “Complete” since we don’t want to see “Archives” here. Otherwise, it would get too long.
For each tab, change the shown properties to only show what would be relevant to posts of each status.
For “Ideas”, I only showed “Status”, “Name”, “Type”, “Post Date”, and “Related Notes”.
For “Drafts”, I showed “Status”, “Name”, “Type”, “Post Date”, “Days from Post”, “Related Notes”, “Carousel/Image File”, “Hashtags”, and “Topics”.
For “Posted”, I showed everything but “Related Notes” and “Day and Time”.
Finally, you can do the same thing with callouts as we did for the board. It’s not shown in the video but just follow the same steps as before.
Finally, let’s create the calendar!
It’ll be helpful to see things on a weekly and monthly calendar from a scheduling perspective. You can then see when you need to spend time writing and editing.
Type “/linked” and press Enter to create a new database view.
Under “Link existing database” on the right, select “Post Database”.
Then select “New table view”.
Then instead of “Table”, select “Calendar”.
Name this version “Monthly Calendar”.
For this one, I set the shown properties to “Carousel File”, “Type”, and “Status”.
Next to where it says “Monthly Calendar” on the left, click on the plus sign.
Select “Post Database” and then select “Monthly Calendar”.
In the next menu, select “Layout”.
Then click on “Show calendar in” and change it from “Month” to “Week”.
Go back and change the name to “Weekly Calendar”.
You can do the callout thing from the last one.
We’re almost done!
Notes Database Views
You only need one gallery of notes for the Home Page since there is less to organize.
Start by typing “/gallery” and hitting Enter for a new gallery view.
On the right, select “Notes Database”.
Select “New gallery view”.
Then press “Done” to go to the settings.
Name this view “Notes”.
Right below, select “Layout”.
For the “Card preview”, I suggest showing the content of the page so you can see the text inside.
For the “Card size”, I chose the small size to fit more notes in this view.
The shown properties here are “Source” and “Topic”.
Go back into the menu and select “Sort”. Sorting the gallery by “Created time” descending will show the most recent notes first.
Guess what! We’re done with the Home Page for now.
Since this tutorial is getting lengthy, I’ve decided to split it into 2 parts. In the next part, we’ll cover the Analytics page, the Focus Page, the document templates, and complete the Home page.
I’ll send out part 2 in a few days. Until then, consider subscribing to this newsletter for more of this Notion content! Thanks for reading!


